Making NFC Album Cards for my friends
I saw Jordan Fulghum’s blog post on building “Album Cards” for his kids, and thought it’d be fun to make some myself!
I was also inspired by a personal friend’s similar home-brew NFC music system. He went next level, building his own NFC reader/speaker interface using an Arduino, with the NFC chips glued to floppy disks, which automatically played the album when scanned. His three year old son is a big fan :D
I don’t have the same connection to physical music media that Fulghum and my friend have – like Fulghum’s son, I also grew up with music as a mostly digital medium. I listened to my individual songs on an iPod rather than full albums, and I also watch/listened to my favorite live performances1 on repeat on Youtube.
I’ve a couple of metalhead friends that like full albums (and vinyl) who have birthdays coming up, so I figured a set of cards of each of their favorite albums would make for good presents :D
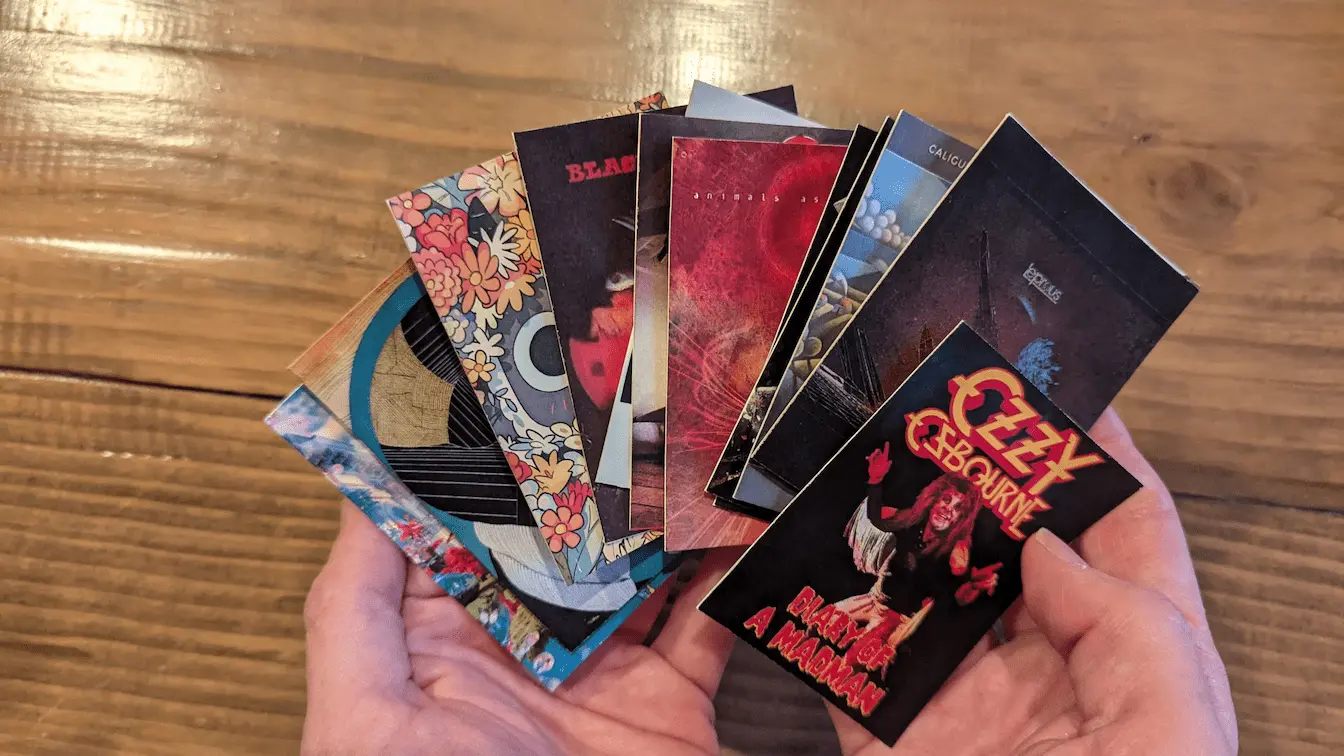
A few days of tinkering on Figma and cutting out paper later, and voilà!
Below are some build notes, feel free to skip ahead to the build instructions for a straightforward list of DIY instructions.
Build Notes
I mostly used Fulghum’s blog post as a guide. These notes document some places where I differed, and some challenges I ran into, along with some ideas on what I’d improve in the future.
On Spotify
The one big difference between my cards and Fulghum’s is that I had mine point to Spotify URLs, rather than hooking up to a local library system (he used PlexAmp).
I chose Spotify because I think my friends use it, and wouldn’t know how to hook up to any at-home media library they might have, but have since realized that I could’ve used Bandcamp for a lot of the albums.
I recommend using Bandcamp when you can, because it has all the same benefits as using Spotify, but the artists get a lot more money for it.
Either way, there’s some benefits to using a generic URL over a PlexAmp server/URL. For starters, you don’t need to download or maintain a specific app, and it’ll work outside of your home network (i.e. you can take the cards to a friend’s place). Anybody can just tap their phone to the card and their browser will open the link, or the Spotify app if they happen to have it.
With Spotify, if the user doesn’t have a subscription, they’ll get a preview page which will at least show the names of the songs. With Bandcamp, the songs are often available for free for anybody (with the ability to then buy high definition versions to support the band).
That said, if I make cards for myself in the future, I think I’ll go with a local-network web-based system. Download the media on a server at home, have a web server pointing to it, and then anybody on the wifi network should be able to visit the URLs stored on the NFC tags.
On Rectangular Cards
Like Fulgham, I ran into the problem that most album covers are square, but the cards I was making are rectangular.
Unlike Fulgham, I had read his blog post before starting, so knew it’d be a problem! I decided to go with rectangular cards anyway though, because I had originally planned to glue the printed album art to Magic the Gathering cards.
I’ve got a load of bulk MTG cards lying around, I like (or maybe am just used to) how they feel in the hand, and figured I could match fun magic art to the album in question.
In the end, I decided to glue the album art to plain white cardstock because I thought it’d look nicer, and I could write little messages on the back of the cards. I still kept the rectangular aspect ratio though, because I feel like a set of rectangular cards is nicer to handle than square cards ¯_(ツ)_/¯
This meant that I ran into the same problem that Fulham did though, needing to make square album covers look good on a rectangular card.
Some of the albums (e.g. Montero) lent themselves well to cropping, which was the easiest solution.
For ones that weren’t happily croppable (e.g. Diary of a Madman, where all the text would be cropped away) I found alternate images online that worked in a rectangular aspect ratio. Often there were existing designs originally made for posters or t-shirts that worked well.
Finally, when I couldn’t figure out anything better, I just centered the album art in the middle of the card and filled in the surrounding space with an appropriate color (usually black or white).
On assembling the cards
I used the same NFC tags that I’ve been using for all my NFC projects, these circular coin tags from Amazon.

To assemble the cards, I marked where each tag needed to go on a sheet of white cardstock, glued it on, and then glued the sheet of paper with album art (9 albums per paper) on top of the cardstock.
I first tried cutting them out with normal house-hold scissors, but kept cutting off too much, and my lines weren’t perpendicular with each other (or sometimes not even straight lines at all).
So I then bought a paper trimmer on Amazon which worked a lot better, though I still had some trouble with making the lines perpendicular. I got better as I practiced more.
The whole process worked out ok, but I’ve some improvements for next time I do this.
Firstly, the NFC tags feel quite thick, and in some cases you can see them bulging up into the art, which isn’t great.
You can buy much smaller NFC stickers for around the same price, such as these:

I haven’t tried these myself, but they’re similar to the ones my friend used for his home media project, and they’re working pretty well for him.
Finally, while I’m happy with the finished product, and think it’s great as a birthday present for friends, they do feel a bit… DIY’y.
You could probably make them more consistent with a better paper-trimmer, or by printing on the cardstock directly (I don’t have a printer, so had to go to FedEx to print out the album covers), but I think the best would be cards printed by a real printing company, such a https://www.makeplayingcards.com/ (MPC).
I’ve never used MPC myself, but people use them to make Magic the Gathering proxy cards all the time and they’re meant to be pretty premium.
There’s also companies out there that make NFC business cards, which could probably be repurposed for this.
That said, doing it at home was much cheaper, so I’d only do the above if I was making a lot of the cards.
Build Instructions
Materials
NFC Tags (I used these but recommend looking for smaller, already adhesive ones, like these)
Cardstock (I used white, any color is fine)
Inkjet Printer and Paper (I printed mine out at FedEx)
A smartphone with the NFC Tools app installed
Album art
Steps
For each album card, download and crop your album card art as necessary.
I used 63mm x 88mm (178.58px x 249.45px) as my dimensions, because that’s the Magic the Gathering card size, but choose whatever you’d like, just be consistent.
Use Google Image’s Tools -> Size -> Large filter to find higher-res art.
If you’re using album art, you’ll have to crop or otherwise edit the square art to fit into the rectangular aspect ratio. I recommend looking for art online where this has already been done for you. Alternatively, make square cards.
Arrange your art (as much as can fit) into one page for printing.
If using a tool like Figma, you’ll want to make a canvas that is Letter (8.5x11) size (or probably A4 size outside of the US). Whatever size your printer prints.
I also put a one pixel red border on the outside of each of my images to make cutting easier.

Print the page!
The higher resolution the better. I don’t have a printer, so I first tried my local coffee shop’s printer, but the print came out pretty bad (I think it was low on color ink).
So then I went to FedEx and got a couple copies of each page made there (came out to around $3.70 total for 4 prints), which turned out nice.
If you have a printer at home, this whole process would be easier! You might also try printing the image out on cardstock directly, I think it might make for a better looking end result.
Glue NFC tags onto a piece of cardstock
The end goal is to sandwich NFC tags in between cardstock and the printed paper page.
I marked where the NFC tags needed to go using pencil (roughly, I definitely didn’t center them uniformly on each card), and then glued them down.
I used this Bearly Art Glue which worked well, but any craft glue (or your basic Elmer’s) should be fine.
Glue the printed page on top of the cardstock and NFC tags
Make sure to get the corners of each card, since you’ll need enough glue to hold the page to the cardstock even with the NFC tag sandwiched in-between.
Let dry
I waited for about an hour to let everything dry before I started cutting the cards out. You do you.
Cut the card “sandwiches” out
As mentioned above, I originally tried cutting the cards out with scissors, but ended up buying a (relatively) cheap paper trimmer on Amazon which worked a lot better.
The red border is really helpful here, especially for images that match the background color of your page.
Write the album URL to each NFC tag
I do recommend using Bandcamp if possible. You should be able to look up the album on Google to find the bandcamp link.
If using Spotify, go to the album in the app and find the “share” button. You should then get a link that looks something like this one for Melina by Leprous: https://open.spotify.com/album/0DvboP39IwpnJU9QrKIpDW
Once you have your link use the NFC Tools app to write it to the NFC tag.
For detailed instructions, see my write-up here: /nfc/#option-1-writing-to-a-tag. The TL;DR is:
- Open the NFC Tools App
- Click the Write button, then the “Add a Record” button
- Select the “URL/URI” record type
- Paste your link in
- Hit “write” and hold your phone to the NFC tag
- For Androids, the NFC reader is usually in the center of the back of your phone.
- For iPhones it’s usually at the top.
Test that it works
Close out of the NFC Tools app if you have it open.
Hold your phone to the NFC tag – if you wrote the link to the tag successfully, the bandcamp link or Spotify app should open on your phone.
Troubleshooting
Spotify link opens in browser instead of app
I had trouble with this on my Pixel 6 Android. You’re supposed to be able to control this with an app’s “Open by default” setting, which should tell the OS to redirect specific HTTP links to the app (e.g. https://open.spotify.com/).
It seems to be a Chromium browser issue. When I switched from Brave to Firefox, and configured Firefox to open links in the app, it worked fine.
If anybody has a better fix, let me know.
Nothing happens when I tap the tag
Use the NFC Tools app with an existing working NFC tag (most metro cards, credit cards, etc) to make sure you know where your phone’s NFC reader is.
For Androids, make sure your phone is unlocked and your NFC permissions are allowed.
For iPhones, you should get a pop-up notification when you tap – make sure you’re not missing that. Also check your permissions.
Mosh!
Playing For Change and the Studio Ghibli 25 Years Concert were some of my favorites.↩︎